
Yes, most trekkers benefit from better insoles. The footbeds that come with walking boots and trekking shoes are usually thin foam fillers, and swapping them for a well-fitted aftermarket insole can improve heel hold, stability and comfort on long days. The key is matching the insole’s volume, support level and shape to your foot and your footwear, not buying the softest one on the shelf.
This guide explains how to choose hiking insoles for trekking shoes and walking boots: the types, how volume and arch shape work, how to fit and trim them, how long they last, and what matters specifically on a multi-day trek in Nepal.
Quick answer: choosing insoles for trekking shoes
| Question | Short answer |
|---|---|
| Do I need them? | Not always, but stock footbeds are usually basic. Upgrade if you get heel lift, arch ache, hot spots or tired feet on long days. |
| Cushioned or supportive? | For trekking with a loaded pack, a supportive insole with a firm heel cup usually beats a purely soft one. |
| Which volume? | Match the space in your boot: high volume for roomy boots and high arches, medium for most trekking shoes, low for snug or narrow footwear. |
| How to test? | Stand on it outside the boot, then inside with your trekking socks. Heel cupped, arch contact without pressure, toes not crowded. |
| When to buy? | Before you break in your boots, so the boots and insoles bed in together. |
| How long do they last? | Roughly a year of regular use; replace sooner if the foam is flattened, cracked or the heel cup has collapsed. |
Do you need insoles in your trekking shoes?
Most boots and trekking shoes ship with a simple die-cut foam footbed. It fills space and adds a little cushioning, but it rarely offers a shaped heel cup or meaningful support under the arch. That is fine for some feet. Plenty of people trek happily on stock insoles.
You are likely to benefit from an upgrade if you notice any of the following:
- Your heel lifts or slides in the boot, especially on ascents.
- Your feet ache through the arch or heel after a few hours.
- You get recurring hot spots or blisters in the same place.
- Your feet feel as if they splay or lengthen under a pack, pushing your toes to the front of the boot.
- The boot feels slightly too roomy even with good socks.
If you have a diagnosed foot condition, significant pain or a history of injury, see a podiatrist before relying on off-the-shelf insoles. An insole is a fitting tool, not a medical treatment.
What good insoles actually do
Insoles are often sold on a long list of benefits. The realistic list is shorter, and more useful:
- Heel hold. A deeper, firmer heel cup centres the heel and takes up spare volume at the back of the boot, which reduces heel slippage and the blisters it causes.
- Stability. A structured insole limits how much the foot rolls and collapses under load. Many people find this reduces fatigue more than extra cushioning does.
- Better fit. By filling unused volume, an insole can make a slightly roomy boot fit properly. It can also reduce the foot lengthening under load, which helps prevent toes hitting the front on descents.
- Pressure spread. A contoured footbed spreads load across more of the sole rather than concentrating it at the heel and ball of the foot.
- Some warmth. A thicker insole adds a layer between your foot and a cold sole, which helps at higher camps. It is not a substitute for warm socks or proper boots.
Insoles are often marketed as fixing plantar fasciitis, shin splints or knee pain. Supportive insoles can help some people with these problems, but results vary and the evidence is mixed. Treat any such claim with caution and take persistent pain to a professional.
Types of hiking insoles
Insoles fall into a few broad families. Brands use different names, so focus on how the insole is built rather than what it is called.
| Type | What it is | Good for | Watch out for |
|---|---|---|---|
| Cushioned (soft foam or gel) | Flexible, soft footbed with little structure | Light day walks, trail shoes, people who simply want more softness | Little heel control; can compress quickly; gel adds weight |
| Supportive / structured | Foam top layer over a firmer shell or stabiliser, with a shaped heel cup | Multi-day trekking with a pack, heel slippage, tired arches | Takes a few walks to get used to; wrong arch height can cause pressure |
| Heat-mouldable | Structured insole that is warmed and moulded to your foot | Feet that fall between standard shapes; boot fitters | Needs correct moulding, ideally done in store |
| Thin / low-volume | Slim footbed that adds shape without taking much space | Snug boots, narrow feet, trail runners | Limited cushioning |
| Custom orthotics | Prescribed devices made from a scan or cast of your foot | Diagnosed biomechanical problems | Need a podiatrist; must still fit the boot’s volume |
For a trek where you carry even a daypack for six to eight hours a day, most people do best with a supportive insole that has moderate cushioning on top. Purely soft insoles feel lovely in the shop and can feel mushy and unstable by day four.
How to choose the right insoles: five decisions
1. Volume: match the space inside your boot
Volume is how much room the insole takes up inside the shoe. It is the most overlooked choice and the one that most often goes wrong.
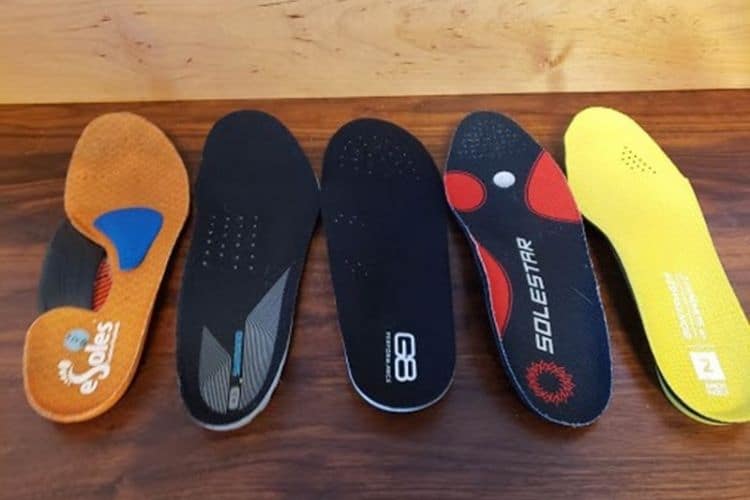
- High volume: thick, with a deep heel cup. Suits roomy hiking boots and people with high arches.
- Medium volume: the most versatile. Suits most trekking shoes and many mid boots, and a wide range of arch shapes.
- Low volume: slim. Suits snug or close-fitting footwear and people with very low arches.
Always remove the stock insole before fitting the new one. Stacking insoles on top of each other usually crushes the toes and lifts the heel out of the heel cup. Remember that sock thickness changes volume too, so test with the socks you will trek in.
2. Arch shape: support, not a hard bump
Work out roughly whether your arch is low, medium or high. A simple check is the wet footprint test: wet your foot, stand on a piece of card and look at the print. A full, wide print suggests a low arch; a thin strip between heel and forefoot suggests a high arch.
Then choose an insole whose arch meets your foot without pressing into it. If you can feel a distinct ridge digging in after a few minutes standing, it is too high for you. People with low or flexible arches often do better with an insole that stabilises the heel and spreads pressure across the whole foot, rather than one with an aggressive arch.
3. Support level: how firm should it be?
Firmer shells give more control and last longer, but they need more adjustment time. Softer, more flexible insoles are easier to get used to but offer less stability. A sensible middle ground for trekking is a semi-rigid insole: firm at the heel and through the midfoot, more flexible under the toes.
4. Materials: foam, gel, cork and top covers
| Material | Character | Trekking notes |
|---|---|---|
| EVA foam | Light, cushioned, affordable | Common base layer; compresses over time |
| Polyurethane (PU) foam | Denser, more durable, a bit heavier | Holds shape longer under heavy use |
| Gel | Good shock absorption | Heavier and can feel warm; often used only at heel and forefoot |
| Cork | Firm, moulds slowly with wear | Takes time to break in; durable |
| Plastic or composite shell | Provides structure and heel control | The backbone of supportive insoles |
| Top covers (fabric, wool, antimicrobial) | Affect friction, warmth and odour | Wool-type covers feel warmer; smooth covers reduce friction |
5. Footwear: boots versus trekking shoes
Heavier leather boots usually have more internal volume and can take a high- or medium-volume insole. Lightweight trekking shoes and trail runners usually suit low- or medium-volume insoles. If you are still choosing footwear, read our guide on how to choose trekking shoes and take your new insoles with you when you try boots on.
Common fit problems insoles can solve
| Problem | Likely cause | What to try |
|---|---|---|
| Heel lift or slipping | Too much volume at the back of the boot | Medium- to high-volume insole with a deep, firm heel cup; check lacing technique too |
| Toes hitting the front on descents | Foot sliding forward or lengthening under load | Supportive insole to hold the heel back; lace the ankle firmly before long descents |
| Arch ache | Little support, foot collapsing under load | Structured insole with an arch height that matches your foot |
| Ball-of-foot pain | Pressure concentrated under the forefoot | Insole with forefoot cushioning; check the boot is not too narrow |
| Toes crushed or top of foot pressed | Insole too thick for the boot | Go down in volume; never stack insoles |
| New blisters after switching | Insole changed where your foot sits in the boot | Break in again on shorter walks; review trim and size |
How to fit and trim insoles
- Stand on the insole outside the boot. Balance on one foot. Your heel should sit in the cup, the arch should meet your foot without pressing hard, and you should feel stable.
- Use the stock insole as a template. Lay it on top of the new one, heels aligned, and mark the outline at the toe.
- Trim a little at a time. Cut only at the toe end, just outside the line, with sharp scissors. You can always cut more; you cannot add it back.
- Test inside the boot with trekking socks. The insole should lie flat with no curling at the toe or sides. Lace up and walk around, ideally on a slope.
- Check the toe box. You still want a thumb’s width or so in front of your longest toe, and room to wiggle your toes.
- Break them in. Wear them for short walks first, then longer days with your pack. Supportive insoles can feel odd for the first few outings.
If your boots and insoles are new, wear them together on several long, hilly walks before you fly. Our guide on how to train for Everest Base Camp includes a build-up of back-to-back walking days that doubles as a footwear test.
Insoles on a trek in Nepal: what is different
Most teahouse treks in Nepal involve long days on stone steps, rough trails and steep descents, repeated for one to three weeks. That changes the priorities.
- Durability over softness. A soft insole that flattens after a week will leave you worse off on the walk out. Supportive, denser insoles hold up better on long treks such as the Everest Base Camp trek or the Annapurna Circuit.
- Descents matter. Long downhill sections, such as the descent back to Namche Bazaar or the stone staircases around Ghorepani and Ulleri, are where heel hold and toe protection count most.
- Cold mornings. At higher lodges, feet start the day cold. A slightly thicker insole and a warmer top cover help a little; good wool socks help more.
- Drying. Pull your insoles out each evening so they and your boots dry faster. This is especially useful in the monsoon months and on the wetter, lower trails.
- Do not trek on brand-new insoles. Fit and break them in at home. Changing your footwear set-up mid-trek rarely goes well.
- Spare options are limited. Kathmandu’s Thamel area and Pokhara have many gear shops, but specialist boot-fitting is harder to find and quality varies. Bring the insoles you have tested.
For the rest of your kit, see our Everest Base Camp packing list and our free trek packing checklist.
How to care for insoles
- Remove them after each day’s walking to air them and the boots.
- Hand wash when needed with mild soap and lukewarm water, using a soft brush. Do not machine wash unless the maker says you can.
- Air dry away from direct heat. Radiators, stoves and lodge heaters can warp foam and shells.
- Check them regularly for flattened foam, cracks, worn top covers or a collapsing heel cup.
How long do insoles last and when should you replace them?
There is no fixed rule. As a general guide, many supportive insoles last around a year of regular use, and longer with occasional use. Cheaper foam insoles may compress within months. Replace them sooner if you see any of these signs:
- The foam has flattened, especially under the heel and ball of the foot.
- The heel cup has softened or lost its shape.
- The top cover is torn or worn through.
- Old aches or hot spots return with no other change in your footwear.
Before a big trek, check your insoles alongside your boots. If either is near the end of its life, replace it early enough to break in the new ones.
Buying checklist
- Take your trekking boots and socks when you shop.
- Remove the stock insole and compare shape and length.
- Pick volume first, then arch height, then support level.
- Stand, walk and if possible test on a ramp in store.
- Check the retailer’s return policy for insoles you have trimmed or worn.
- Allow at least two to three weeks to break them in before you travel.
If you are new to multi-day walking, our guide to trekking for beginners and our overview of trekking in Nepal are good next reads.
Conclusion
The best insoles for trekking shoes are the ones that fit your boot’s volume, meet your arch without pressure and hold your heel firmly. Choose support over softness for multi-day treks, fit and trim them carefully, and break them in with your boots well before you fly. When your feet are sorted, use our trip planner to start shaping your Nepal trek.
Frequently asked questions
Are hiking insoles worth it?
For many trekkers, yes. Stock footbeds are usually thin and basic, and a well-fitted supportive insole can improve heel hold, stability and comfort over long days. If your boots already feel perfect, you may not need them.
Should I take out the original insoles before adding new ones?
Yes, in almost all cases. Stacking a new insole on top of the original reduces toe room and lifts your heel out of the boot’s heel cup, which can cause blisters and heel slip.
What type of insole is best for hiking boots?
For multi-day trekking with a pack, a supportive or semi-rigid insole with a firm heel cup and moderate cushioning suits most people. Choose the volume to match your boot and the arch height to match your foot.
How do I choose insoles for flat feet?
Look for a supportive insole with a stable heel cup and a low to moderate arch that spreads pressure across the foot. An aggressive high arch can feel uncomfortable on a low or flat arch. If you have pain, see a podiatrist.
How often should you replace hiking insoles?
As a rough guide, about once a year with regular use, sooner for soft foam insoles. Replace them when the foam is flattened, the heel cup has collapsed or old aches return.
Can insoles make boots that are too big fit?
A higher-volume insole can take up a small amount of extra space and improve heel hold. It cannot fix boots that are a full size or more too long. In that case, change the boots.
How long does it take to break in new insoles?
Allow several short walks and a few longer ones, typically two to three weeks of regular use. Supportive insoles can feel strange at first. Do not start a long trek on insoles you have not tested.
Can I buy good insoles in Kathmandu?
Kathmandu and Pokhara have many outdoor shops, but specialist fitting is hard to find and product quality varies. It is far better to buy, fit and break in your insoles at home before you travel.