
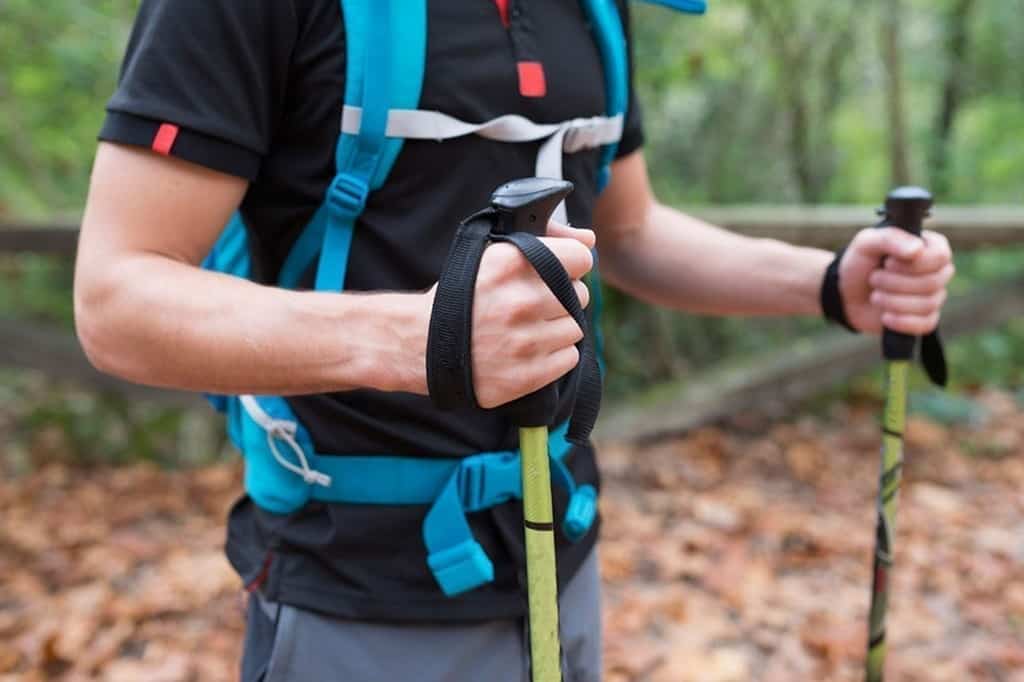
To choose trekking poles, start with length: when you hold the grips with the tips on the ground, your elbows should bend at about 90 degrees. Then pick a shaft material (aluminium for toughness, carbon for low weight), a locking system you can operate with gloves, comfortable grips and the right tips and baskets for your terrain. For most Nepal treks, an adjustable pair of aluminium or carbon poles with reliable locks is the safe choice.
Quick answer: trekking pole checklist
| Feature | What to look for |
|---|---|
| Length | Elbows at roughly 90 degrees on flat ground; adjustable poles let you change length for ascents and descents |
| Shaft material | Aluminium: tougher, tends to bend rather than snap. Carbon: lighter, damps vibration, can crack under side loads |
| Locks | External lever locks are easiest to adjust and check, including with gloves |
| Grips | Cork for sweaty hands, foam for softness and light weight, rubber for cold |
| Tips and baskets | Carbide tips for grip; rubber tip protectors for stone steps and villages; small baskets for mud and snow |
| Style | Telescoping adjustable poles for versatility; folding poles for packability |
| Pair or single | A pair gives better balance and spreads effort evenly |
Are trekking poles worth it?
For most people on a multi-day trek, yes. Poles give you two extra points of contact, which helps balance on loose ground, river crossings and icy patches. On descents they let your arms take some of the load that would otherwise go through your knees and ankles. On long ascents they help you keep a steady rhythm.
They are not essential for everyone. Some walkers find them a nuisance on easy, flat paths or on scrambly ground where they need their hands. Poles also need a little technique: used badly, they can tire your shoulders or catch on rocks. If you have never used them, practise on hilly walks before your trip.
In Nepal, poles earn their place. Treks such as the Everest Base Camp trek, the Annapurna Base Camp trek and the Poon Hill trek involve long stone staircases, steep descents and, at altitude, frozen trail in the mornings.
Step 1: get the length right
Correct length is the most important part of choosing trekking poles. Too long and your shoulders hunch and tire; too short and you stoop and lose the balance benefit.
The 90-degree rule
Stand upright in the shoes you will walk in. Hold the poles by the grips with the tips on the ground near your feet. Your forearms should be roughly parallel to the ground, with your elbows bent at about 90 degrees. If you are buying fixed-length poles, test this in store.
Trekking pole size chart by height
Use this as a starting point for fixed-length poles, or to check that an adjustable pole has enough range for you.
| Your height | Suggested pole length |
|---|---|
| Under about 155 cm (5 ft 1 in) | 100 cm |
| About 155–170 cm (5 ft 1 in – 5 ft 7 in) | 110 cm |
| About 173–180 cm (5 ft 8 in – 5 ft 11 in) | 120 cm |
| About 183 cm (6 ft) and over | 130 cm |
Charts are approximate because arm and leg proportions vary. If you are around 183 cm or taller, choose adjustable poles that extend to at least about 130 cm. Most adjustable poles run from roughly 60 cm up to around 140 cm, so shorter trekkers are usually well served.
Adjusting length on the trail
- Uphill: shorten each pole by about 5–10 cm, more on very steep ground.
- Downhill: lengthen each pole by about 5–10 cm so you can plant them ahead without leaning forward.
- Traversing a slope: shorten the uphill pole and lengthen the downhill pole.
This is the main reason we recommend adjustable poles for Nepal. Many days include a big climb and a big descent, sometimes both before lunch.
Step 2: choose a pole style
| Style | How it works | Best for | Trade-offs |
|---|---|---|---|
| Telescoping adjustable | Two or three sections slide inside each other and lock | Most trekkers; easy length changes for ascents and descents | Longer when packed than folding poles |
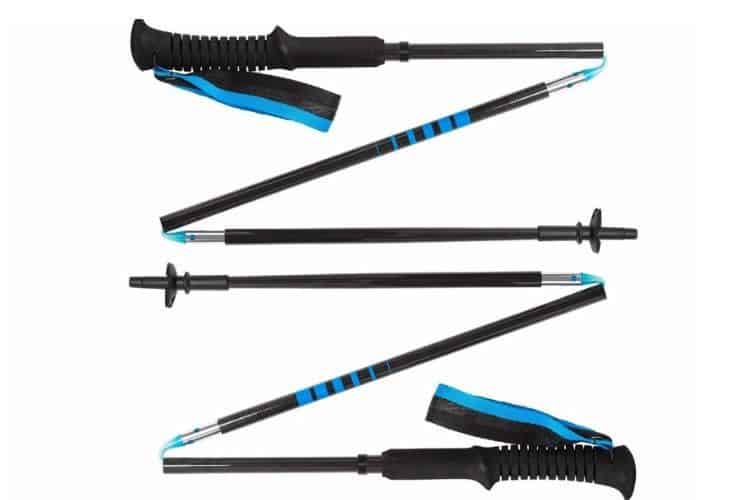
| Folding (Z-style) | Sections connected by an internal cord fold into a compact bundle | Flights, travel, stowing on a pack during scrambles | Some are fixed length or have limited adjustment; joints can wear |
| Fixed length | One length, no adjustment | Light weight and simplicity, if you know your size | No change for terrain; harder to pack |
| Shock-absorbing | Internal spring softens impact, often switchable | People with sensitive knees, hips or ankles | Slightly heavier; some walkers dislike the bounce |
| Ultralight | Very light shafts, usually carbon, often folding | Fast and light trips, runners | Less robust; more prone to breakage under side loads |
Step 3: aluminium or carbon fibre?
This is the biggest trade-off between weight and durability.
| Aluminium | Carbon fibre | |
|---|---|---|
| Weight | Heavier; a pair is commonly around 500–600 g | Lighter; a pair is commonly around 350–500 g |
| Durability | Tends to bend rather than snap under heavy stress | Strong along its length, but can crack or splinter if levered sideways or struck |
| Vibration | Transmits more vibration | Damps vibration well |
| Cost | Generally cheaper | Generally more expensive |
| Trail repair | A bent section can sometimes be straightened enough to keep using | A cracked section usually needs replacing |
For a remote trek, the failure mode matters. A bent aluminium pole will usually still get you to the next village; a snapped carbon one will not. Many trekkers in Nepal choose aluminium for that reason, especially for routes with lots of boulder fields, such as the approach to Gokyo Lakes. Carbon is a good choice if weight matters and you are careful not to jam the tips between rocks.
Very cheap poles may use steel or low-grade alloy. They are heavy and often have weak locks, which is the part most likely to fail.
Step 4: pick a locking mechanism
The lock holds the pole at its set length. If it slips under load, especially on a descent, you can lose your balance. Choose a lock you can check easily and adjust with cold hands or gloves.
| Lock type | How it works | Pros | Cons |
|---|---|---|---|
| External lever (flick or clamp) lock | A clamp on the outside of the shaft closes with a lever | Fast, works with gloves, easy to see if it is closed, tension adjustable with a small screw or dial | Can catch on vegetation; tension needs occasional adjustment |
| Twist lock | Twist sections to expand an internal plug | Slim, clean shaft, nothing to snag | Can slip if under-tightened or seize if over-tightened; harder with gloves and in cold, wet or gritty conditions |
| Push-button lock | A spring button clicks into a hole | Quick to deploy, common on folding poles | Limited or no length adjustment on some models |
| Combination | Usually a push-button or folding section plus a lever lock for fine adjustment | Compact and adjustable | More parts to check |
Most outdoor retailers and guides now favour external lever locks for trekking, because they are easier to check at a glance and easier to operate in the cold. That is our recommendation too. Whatever lock you choose, test every lock under your full body weight before each day’s walk.
Step 5: grips and straps
Grip materials
- Cork: resists sweat, damps vibration and gradually moulds to your hand. Good for long, warm days in the lower valleys.
- Foam (EVA): soft, light and absorbs moisture. Comfortable and common. Can wear faster.
- Rubber: insulates in cold weather, but can rub and feel clammy with sweaty hands.
An extended foam section below the grip lets you choke down on steep ground without changing length. Some grips are angled slightly forward to keep the wrist neutral.
Wrist straps
Adjustable, padded straps let you take some weight through the strap rather than gripping hard all day. Thread your hand up through the loop from below, then grip the pole so the strap sits under the heel of your hand. Take your hands out of the straps on river crossings, unstable bridges and scrambles so you can let go quickly if you slip.
Step 6: tips and baskets
- Carbide or steel tips give grip on rock, packed snow and ice. Standard on most trekking poles.
- Rubber tip protectors stop the tip skidding on smooth stone, reduce noise and damage on paved steps, and protect your pack in transit. In Nepal, fit them through villages, on flagstone stairs and inside monastery and lodge grounds.
- Small trekking baskets stop the tip sinking into mud and soft ground.
- Larger snow baskets are useful only if you expect deep snow, for example on a winter crossing of a high pass.
Carry spare rubber tips. They wear out or get lost on long treks.
Choosing poles for your body and fitness
- Knee, hip or ankle problems: poles reduce the load on joints during descents. Shock-absorbing poles may help some people. If you have a medical condition, take advice from a physiotherapist. Trekking poles are not a substitute for a medical walking aid.
- Wrist or elbow sensitivity: softer foam or cork grips and well-adjusted straps reduce strain.
- Smaller hands: some poles come in shorter or women-specific versions with slimmer grips and a shorter range.
- Newer trekkers: a straightforward adjustable aluminium pole with lever locks is the most forgiving choice. Our guide on how to get in shape for trekking includes hill sessions where you can practise.
How to use trekking poles properly
- Set the length for the terrain before you start each section.
- Use the straps on easy ground so your hands can relax.
- On the flat, plant the pole opposite to the leading foot, as in normal walking, with the tip slightly behind you.
- Uphill, shorten the poles, keep them close and push down and back to help drive you up.
- Downhill, lengthen the poles, plant them slightly ahead and let them take some of your weight. Keep your knees soft.
- On stone steps, plant both poles on the step below before you step down, especially on the long staircases on the Annapurna side of the hills, such as around Ghorepani.
- On scrambles and ladders, collapse the poles and stow them on your pack.
Trekking poles in Nepal: practical tips
- Bring two. A pair is more useful than one, and if one breaks you still have the other.
- Pack them in hold luggage. Security rules vary by airport and country. In the US, the TSA says blunt-tipped poles may be allowed in carry-on bags but sharp-tipped poles are not, and the final decision rests with the officer. UK airports apply their own interpretations. The safest approach is to pack poles in your checked bag or your porter duffel, collapsed and with tip protectors on.
- Mind the domestic flight weight limits. Small aircraft on routes such as Kathmandu or Ramechhap to Lukla have strict baggage limits. Poles count towards your allowance, so light poles help.
- Thamel gear shops. Kathmandu’s Thamel district sells many poles, from genuine imports to copies. Prices can be low, but lock quality varies a great deal. If you buy locally, test every lock hard in the shop.
- Cold mornings. Lever locks are easier to adjust with gloves at high camps. Twist locks can be tricky when cold or gritty.
- Snow and ice. Poles help on frozen trail but do not replace microspikes or crampons where those are needed. Ask your guide about conditions for high passes.
- Respect the trail. Use rubber tips in villages and on monastery steps, and do not plant poles on mani stones, prayer walls or crops.
For a complete kit list, see our Everest Base Camp packing list and essential items for trekking. For trail safety more broadly, read our safety tips for trekking in Nepal.
Care and maintenance
- After each trek, extend the poles fully, wipe away grit and let the sections dry separately before storing them.
- Check lever-lock tension regularly and adjust with the screw or dial if a section slips.
- Do not oil twist locks unless the manufacturer advises it; oil can stop them gripping.
- Inspect carbon shafts for cracks after any fall or impact.
- Replace worn tips and baskets before a big trip.
Conclusion
The right trekking poles are adjustable to the correct length, use locks you trust, and have grips you can hold all day. For Nepal, prioritise durability and easy adjustment over shaving every gram, bring rubber tips for stone steps, and practise with them before you fly. Once your kit is sorted, browse our guide to trekking in Nepal to choose your route.
Frequently asked questions
What size trekking poles do I need for my height?
As a rough guide: under about 155 cm, 100 cm poles; 155–170 cm, 110 cm; 173–180 cm, 120 cm; 183 cm and over, 130 cm. Check that your elbows bend at about 90 degrees with the tips on the ground, and choose adjustable poles if you can.
Should I use one or two trekking poles?
Two poles give better balance, spread the effort evenly across both arms and take more strain off your knees on descents. One pole can be enough on easy ground or if you need a free hand.
Are carbon or aluminium trekking poles better?
Carbon poles are lighter and damp vibration better. Aluminium poles are usually cheaper and tend to bend rather than snap, which many trekkers prefer on remote, rocky routes. Both work well if they fit you and have good locks.
Which locking mechanism is best on trekking poles?
For most trekkers, external lever locks are the easiest to adjust, check and operate with gloves. Twist locks work but can slip or seize, especially when cold or dirty.
Can you take trekking poles on a plane?
Rules vary. The US TSA allows blunt-tipped poles in carry-on bags but not sharp-tipped ones, at the officer’s discretion. Many UK and other airports do not allow them in the cabin. Pack them in checked luggage to be safe.
Should trekking poles be shorter going uphill?
Yes. Shorten each pole by about 5–10 cm going uphill and lengthen them by a similar amount going downhill. On a traverse, shorten the uphill pole and lengthen the downhill one.
Do I need trekking poles for Everest Base Camp?
They are not mandatory, but most trekkers find them very useful for the long descents, stone steps and icy morning trail. They reduce strain on the knees over a trek of nearly two weeks.
Can I buy trekking poles in Kathmandu?
Yes, Thamel has many gear shops selling poles. Quality ranges widely, and locks are the most common weak point. If you buy there, test each lock under your full weight before you pay.